28 October 2013

Harvest dinner

Hello everyone....I am going to have to be quick
We currently have a power cut - it's been off since 11 am and hubby has put the
generator on for a bit just to keep the food in the freezers OK so I am taking the opportunity to get this post done before I lose wifi/internet again.
 
What is really perplexing is that we did not get the really severe weather that hit some parts of the UK today and yet our village is without power......the mind boggles!!!
 
Anyway here are some of the pictures of hubby and his men erecting our marquee Thursday night
 
 
thank goodness for floodlights
 
 
instructions were read by torch light
 
 
but we had to beat the rain......and oh boy did it rain the following morning
 
 
They had to have lanterns on inside to see what they were doing, but hey they did an amazing job
 
Peter fitted the carpet, heating and lighting the following day whilst I got baking......
 
My first ever cake pops - what do you think of the mummys?  I got in such a mess and yes I was wearing quite a lot of sprinkles and candy melts by the time I had finished!!!
But I did have fun!
 
Then I made some cupcakes
American sponge cake with Chocolate Crème au Beurre and snazzy Halloween rings to decorate!
 I did cheat and bought some Mr Kiplings Halloween French fancies for the top tier - oh the shame!
 
What I failed to take a picture of was my Coca-Cola Ham...........a Nigella Lawson recipe I have used for many years, which has become a firm family favourite.
Google it and give it a go - it is so delicious and went down a storm at the dinner.
 
Here is everyone Saturday night just before the meal
 
As you can see our son made it down from University.....it was great to see him, it's been a long 5 weeks for this Mum
 
He headed back to University Sunday morning so he could play rugby for his hall that afternoon, then I got a phone call at 9pm and I knew from his voice that something wrong.
Ben had been injured whilst playing rugby and had spent 7 hours in hospital.
He has fractured ribs!
 
I've managed to speak to him on the phone today - he's in quite a bit of pain, unable to move much so of course he's missed todays lectures but after a couple of phone calls to the University we have things sorted - Campus staff and the sub warden have been to check on him & one of his flat mates got him some lunch - thanks Alex
 
It is so hard not being there, but I guess this is all part of growing up for him and for me!
 
This is certainly a weekend I won't forget in a hurry!!!
 
Hope you enjoyed the piccies
best be off......just heard back from the power company
a tree took out some power lines and they hope to have us back on soon.
 
Bye for now
Hugs
24 October 2013

Not another Christmas card!

I'm afraid it is true, but it's a cutey and quite apt bearing in mind what I will be up to for the next couple of days!
 
My husband and I are hosting our Annual Harvest Dinner this weekend
our way of saying thank you to our men for putting in those long hours over the summer to help us bring in the harvest!
 
So I will be up to my eyeballs baking & cooking
and the best bit for me is I get to see our son Ben who is coming home for the first time this weekend
(he went off to University in September)
 
I am just so impressed how clean Gingy is - I always seem to end up wearing the ingredients!
 
HIS INGREDIENTS
Dustin Pike Christmas in July 2013 - CIJ097
DP - Country Companions Winter Wishes
Ribbon from stash
Chalk ink
Spellbinders circle die
Shinhan Twin Touch Brush Markers:
GINGY: BR107, BR103, BR96, BR92, WG7, RP7, RP293, BG179, R140, R11, R2
BAG: BR109, BR115, BR116, BR99
GROUND: GY175, GY237, GY231
POT: BR113, BR134, BR101, BR100, WG6
ICING & HAT: PB144, BG3, BG5
SHADOW: WG7, WG5
 
Fingers crossed we get the marquee up soon - ie tonight (Thursday)
It should have been up hours ago unfortunately hubby got unexpectedly delayed on another job - he should be phoning soon to say he's on his way home & to put the kettle on.
Why, because he's getting the men to come over and erect the marquee by floodlight....yep you read that right - it's pitch black outside & they are planning to do it tonight!
There is method in his madness - it is due to rain tomorrow.
 
If I can get any decent photo's of them have no fear I will post them
I suspect it could be quite comical!!
 
Well that's all from me for a couple of days as I bake my socks off!
 
Oh and 3 pumpkins need carving.......I think Ben can do that one!
 
Have a great weekend everyone
see you next week :0)
 

23 October 2013

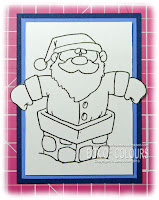
How to........create "Cut Out" images

Not sure if "Cut Out" is the best description for this technique but
hey it's what I call it!
 
Now there are two ways I do this.......
........and I have prepped a demo for both!
 
 
OK then, lets get started
 
Firstly you will need your chosen image and either stamp it or print it out
(don't choose an image that is overly fiddly....simple is best)
 
NB do all the cutting out BEFORE you colour your image
It is heart breaking to have spent ages colouring only for your hand to slip with the knife or goof with the die cut!!!
 
CRAFT KNIFE & SCISSORS
 
STEP 1
 
Easy bit first
Trim the straight sides (in this case the top and bottom)
With a craft knife cut up to the part of the image you want to protrude over your mount (ie Santa's hand) as I have done on the left hand side.
Then cut around the hand with scissors as demonstrated on the right
 
STEP 2
Mounting is a little trickier with this method
I have found it best to lay your image on top of your mounting card with the amount of border you want showing on two edges as above.
Then with a ruler as a guide mark with pencil where you want the other two sides cut.
Put your image safely to one side and trim the remaining edges as per your marks.
 
STEP 3
 
If like me you prefer a double mount you will be glad to hear the second one is much easier to do
Simply measure or eyeball your second mount so that it is evenly larger than your first.
 
STEP 4
 
Here are the three layers put together.
Of course you won't adhere them to one another until you have coloured your image.
You can glue them flat or add dimension with foam squares between the image and the mounts or when you mount the finished topper to your card - the choice is yours!
 
 
With me so far?
 Righty Ho, lets carry on with the second method:
 
 
DIE CUT & SCISSORS
 
STEP 1
Now, for me this was the trickier method to master!
This time you need to trim around the area you wish to protrude over your mounts first.
But do not cut any card away - just carefully trim around it.
As you can see from the above image you will need to cut around much more of the image than in method one and I will explain why soon.
 
STEP 2
Although you want the same amount of Santa's hand to show in order for you to fit the die under his hand you need to cut more (to the arrows) otherwise you risk tearing your image.
 
STEP 3
Once you have cut both sides you are ready to wriggle your die underneath Santa's hands.
It is very important that they are above the die - you do not want to cut them off when you run your die cut through your machine!
I secure my work with Scotch Removable Tape - please do not use normal tape
(any glue residue can be removed with an eraser later)
Now simply run this through your die cut machine.
 
STEP 4
 
 
Remember those extra long cuts?
Turn your image over and stick some normal sticky tape over them.
If you have cut out these parts neatly and carefully adhere the tape you will hardly see the cuts from the front, especially once your image is coloured.
 
STEP 5
Mounting is much easier - if you have nesting dies, just pick the next ones up and cut them out in your contrasting coloured cardstock.
However, please note that sometimes they are not exact enlargements and if like me you are uber picky then you may well prefer to cut your mounts by hand.
 
STEP 6
 
Here is Santa with his die cut mounts.
 
 
and for direct comparison:
 
Knife Method                      Die Cut Method


Why not give it a try next time you are making a card and remember if using die cuts you don't have to stick to boring squares and rectangles!!!
 
I hope you have found this tutorial helpful
Please don't hesitate to contact me if you need further assistance
 
Bye for now

22 October 2013

How is your Christmas card making going?

For me Christmas would not be the same without a handful of
comical Dustin Pike characters gracing my
Christmas cards!!!
 
I printed out a whole bunch and have been colouring them up as and when I had a few spare minutes, trouble is I just haven't had time to make them in to cards.....
.......until now!
 
So here is the first
 
Poor old Santa has been enjoying Mrs Christmas's cooking a tad too much me thinks,
'cause he's gone and got himself stuck in the chimney!!
 
SUPPLIES
Dustin Pike Christmas in July 2011 - CIJ52
DP - Frosty Christmas - Lili of the Valley
Copics
SUIT R22, R24, R29, R59, N8, BG93,BG96, W00, W0, W1, W2, W3, C00, C0, C1, C3, C4
SKIN E0000, E000, E00, E41, E42
BEARD T0, T1, T2, T3
SKY B32
CHIMNEY E70, E71, E74, E77, E79, E11, E13, E15, E17, E18, W4, W6
SNOW BG0000, BG000, N0
White gel pen for snow flakes
Chalk ink
 
 
Do you like how his arms are hanging over the frame mount?
Would you like a tutorial on how to achieve this?
 
Well come back tomorrow
and I'll show you how!
 
Toodle pip


21 October 2013

Crafty Sentiments Guest Designer again

Hello there, as promised here is the second card using a lovely
Crafty Sentiments Designs image
 
Yes I know, more tartan/checks......hey I liked the colours!!!
 
 
SUPPLIES
Angel - Crafty Sentiments Designs
DP - Christmas in the Country by Do Crafts
Holly Die - Memory Box
Chalk ink
Coloured Pencils
Copics:
SKIN - E0000, E000, E00, E41, E42
HOLLY - YG61, G2, R37
WINGS - B0000, B000, N0, N1, N2
FLUTE - C1, C3, C5
DRESS - G40, YG61, G21, G94, T1, T2, T3, T5, T6
SHOES - R37, R39
HAIR - E70, E71, E74, E77, E79
BACKGROUND - YR30, E81, E70, E71
SHADOWS - W3
 
 For more inspiration using this and the other new releases please hop on over to the blog HERE and of course you can find these and all the other Crafty Sentiments Designs HERE
 
So thank you Suzette for inviting me to design for you, I've had a blast!
 
Back soon with more cards
and hopefully piccies of the cakes I am making this week for our
Annual Harvest Dinner
 
Crafty Hugs

20 October 2013

Guest Designer for Crafty Sentiments

Heavens to Murgatroyd!
Yep, I am a Guest Designer today too
 
 
Suzette very kindly asked me to be a Guest Designer for
Crafty Sentiments Designs
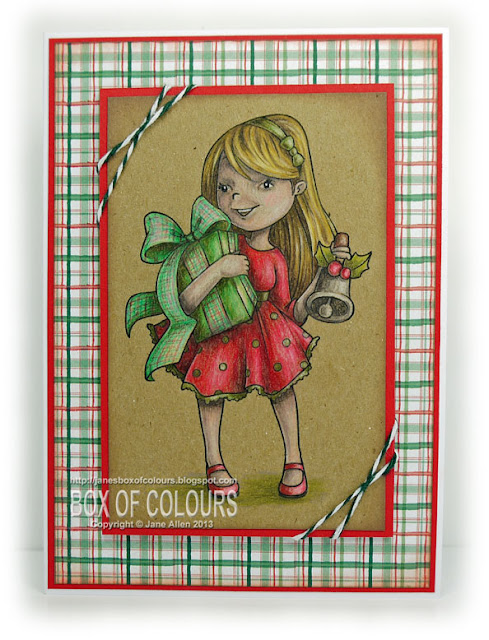
and here is the first of two cards I created for her.....
I thought I'd give the pencils another workout on this image, but went back to my trusty kraft card.
I also attempted to mimic the DP design on the ribbon, with mixed success - hey at least I gave it a go!
 
SUPPLIES
Bell and Present - Crafty Sentiment Designs
Pencils
Twine from stash
DP: Country Companions - Winter Wishes
 
 
If you like this image and would like to see more from this new release then
please click HERE for more inspiration and HERE to go splurge on a few!!


Now apologies once again for slacking on the blogging.....
 
.......at the beginning of the month my father was taken into hospital - thankfully he is now home and much better - although an operation will be needed to get him back to normal.
 
And our Westie, Roo has begun to succumb to the cancer she was diagnosed with back in March......
I may have my own parking space at the vets soon!
So my days are spent coaxing her to eat, administering meds and trying to keep her as comfortable as possible.
 
And there was me thinking that once our son went off to University I'd have all this extra time to fun stuff like crafting........ha ha looks like someone had other ideas!!!
 
 
Anyway, I am off for now, but if you check back tomorrow I'll be
sharing my second Crafty Sentiments creation.
 
Hugs

19 October 2013

Pink Gem Designs Guest Designer

I am honoured to say that I have been asked to be a Guest Designer for
Pink Gem Designs - woo hoo
 
and todays theme at
A Gem of A Challenge
is:
 
"SPOOKY"
 
and here is my card:
In order to make the pencils "pop" a little more than normal ie on kraft card
I printed the image on dark grey Murano pastel paper.
 
SUPPLIES
Chloe with Cauldron - Pink Gem Designs
Caran D'Ache Pablos & Faber Castell Polychromos
Murano pastel paper by Daler Rowney
DP - Halloween Spiderweb by Heidi Grace Designs
Spellbinders Nestability dies
Ribbon from stash
 
Please hop on over to the Blog to see what inspirational
creations the Design Team have made for this Spooky Challenge
 
Crafty Hugs

10 October 2013

Christmas card and some new markers

I read somewhere that we have 11 weeks until Christmas....
yikes!!
 
So I plan to craft my little socks off today - a reward for 
cleaning windows, frames & dreaded venetian blinds yesterday!
(oh and all the appliances in the kitchen & utility room) 
and will be finishing off the remaining 14 windows and blinds tomorrow!!
 
Anyway here is another card to add to my
Crimble Card Box
Ah more Copic work I hear you say.......
....err well no it's actually been done with Shinhan Touch Twin Brush Markers!
 
 
 I am not abandoning Copics - perish the thought!
They are fantastic markers, give great results,
but they have a very annoying habit (well mine do anyway) 
........the earthtones have a tendancy to go sticky/shiny when building layers of colour.
 
Up to now my rescue remedy when this happens has been to
cover the offending area using coloured pencils.
 
Well, for a while now I have been admiring my friend Elaine's work
and she uses Shinhan Touch Twin Brush markers
 
 so I thought I'd give them a try:
The ink is how can I explain "thinner" than Copic and I found that if I removed the shiny area of Copic with colourless blender I could use the Shinhan whereas if I tried to re-apply Copic it would just sit on the surface of the cardstock again!
 
But that ability to permeate cardstock when Copic ink goes sticky comes at a price!
 
The above image is pure Shinhan and both the reds and more surprisingly the yellows bled quite badly.
I also noticed that lighter colours often remove rather than blend with darker shades
but I have been reliably informed "a lighter touch" and adapting my Copic technique to accommodate the ink difference will give better results!
 
for me
I guess it's a bit like comparing
 
VW to Rolls Royce
 
both get you from A to B
just one does it with more refinement
(and costs you considerably more)
 
.............and what can I say this girl has expensive taste
 
so I'll be sticking with my beloved
COPICS
 
but I will continue to play with the Shinhan and share the results as I learn to adapt my current alcohol marker technique.
 
Thanks for dropping by
Hugs
 

8 October 2013

Without Words Challenge for October

Hello there
Are you in the mood for a challenge?
 
over at the Without Words Challenge Blog
our theme this month is:
 
PUMPKINS
think greens, browns and oranges

 
and as you can see from my example you don't have to
include pumpkins!!!
Even having made Christmas cards throughout the year I am still a little behind
so if the challenge allows I'm making Festive ones!
 
SUPPLIES
Bismarck by Mo Manning
Caran D'Ache Pablos & Faber Castell Polychromos
DP: Krafty Christmas by Lili of the Valley
Ribbon from stash
Jumbo Java Chalk ink
 
Want to see a close up of Bismarck?
Coloured pencils are fantastic when you want to create texture
ideal when colouring fur!
 
 
For your chance to win
 
 
enter your creations HERE
 
 
and meanwhile I thought I'd enter Bismarck in the following challenges:


Crafty Hugs

5 October 2013

A quick post

 
I know my return to blogging has been somewhat shortlived!!
 
Well sometimes life has a habit of tripping you up
....my father was taken ill & hospitalised,
thankfully he was released after a couple of days but had to go back yesterday for more treatment.
 
 
So a little later than planned here is a cute Christmas card
SUPPLIES
Sweetest Christmas - Darcie's
Tin Pin - Darcie's
DP - Nordic Christmas by First Edition Paper
Ribbon from stash
Copics
 
You can use the stamps on their own or with the addition of these cute Tin Pins!
 
 
Hopefully back soon with more
Crimble Creativity
Hugs