15 December 2018

Christmas card Design 2018

For those of you that follow me on 
Instagram or Facebook

you will have already seen this......but for those of you that may have missed it, here is my 
2018 Family Christmas card Design

100% Copic!


and here is the final image


It never ceases to amaze me as to what can be achieved with Copic markers!


If you would like to see more of my work as I mentioned earlier you can also find me on both Instagram and Facebook


Thanks for dropping by my blog

11 December 2018

MFT RELEASE DAY - DECEMBER 2018

How many items have you got on your wish list?


Before you head off to the store for that little pre-Christmas crafting treat, allow me to share my final project from this release:


Cuteness alert!  These sweet little critters are just adorable and can be found in the new "Fox and Friend" stamp set (matching dies are available too)

I opted to keep the overall design of the card quite simple, with a background from the Petite Plaid paper pad.


COPIC COLOURS:
Background: B0000, B000, G20, G40, T1, YG61, 0, YR21
Fox: YR30, E40, E21, E11, E13, E15, RV91, W9
Mouse: W0, W1, W2, W3, W4, W5, W7, RV91


As always on the day of the launch, please don't forget to leave a comment on my blog for your chance of winning one of two $100 MFT Store Vouchers......now wouldn't that be an awesome early Christmas present!

All that is left for me to say is........

Happy Shopping


9 December 2018

MFT DECEMBER RELEASE - COUNTDOWN DAY 2

Today I wanted to share the project I created with the "Best Wishes" Die-Namic, our Free with $60 die that will be available from MFTstamps.com for qualifing orders from Tuesday.


The background was created using the Geometric Stars Stencil and some Distress Oxide inks, with a spritz of Perfect Pearls mist to finish.  I continued the colour scheme with Sweet Tooth and Blue Yonder card stock, adding several mounts to a top folding square card base.

I cut the sentiment out three times, twice in white with a final layer of Blue Yonder, which I then coated with Nuvo Glitter Gloss for added sparkle.  I find three layers of cardstock glued together is more than sufficient.


I will be back on launch day but please don't forget to visit the MFT Blog to see more inspiration using products from the release on Tuesday.

Until then
Happy Colouring


7 December 2018

MFT DECEMBER RELEASE - COUNTDOWN DAY 4

Hi there, back today with another new release that will be available from Tuesday at MFTStamps.com


This image is from the new Birdie Brown "Friends at First Sip" stamp set and I created a shaped card using the new Blueprints 33 Die-Namic.


For those of you who may be interested in following my colour scheme, here are the Copic colours I used in this project:

COPIC COLOURS
Face: E0000, E000, E00, E40, E41, V20, BV20, B12, B34, 100
Hair: E21, E23, E25, E47, W7
Sweater: B12, B14, B37, B39, B97, W4, W6, W8
Jeans: B93, B95, B97, W4, B91
Shirt: B01, C1, C2
Bag: C0, C1, C2, C4, C5, C6, B95
Boots: E40, E41, E42, E43, E44, E47, W2
Dog: W00, W0, W1, W2, W3, W7, YG67, R24, B14, RV91
Background: YR30, E50, E81, W1, W2
Coffee Cup: BG0000, B0000, E81, E84, E42, W3

Thanks for visiting my blog today, I'd love to hear what you think of the new release so far.  
I will be back again in a couple of days with another project.

Happy Colouring


6 December 2018

MFT DECEMBER RELEASE - COUNTDOWN DAY 5

Well hello there and welcome to the start of the countdown for this months new release
at MFT Stamps.

Today I have a new Die-Namics called "Bold Beautiful", ideal for those days when you are not in the mood to colour!


 I opted for a sparkly, copper colour scheme - with the aid of MFT Copper Sparkle and Copper Shine card.  Both the card base and inside of the lettering were cut from Neenah 110lb.  I added just a smidge of Copic colouring (E30 and E21) and finished it off with a  touch of Aqua Shimmer Glitter Gloss.....well it is nearly Christmas after all!


Thanks for dropping by, I will be back tomorrow with some colouring, I do hope you will join me.

Until then
Happy Colouring


23 November 2018

ARTISTIC EXPRESSION NOVEMBER 2018

Hello there, it's time for another


and this month I explain how I go about colouring things that are
BLACK and WHITE

and chose to use this adorable little penguin from the newly released
Ready, Set, Snow stamp set.


So please head on over to the MFT Blog where you will find the detailed tutorial.

I'd love to hear what you think and see you giving it a try yourselves.

Happy Colouring

22 November 2018

MFT COLOUR CHALLENGE #106

I've been having great fun creating the panel for the latest 
Colour Challenge over on the MFT Challenge Blog


Now, before I go any further the credit for this awesome stitch design goes to Jennifer McGuire.  I saw her teacher card featuring this ages ago and had been itching to give this a go myself.


I used DMC Perle Cotton 5, having cut out my cross-stitch grid with the Cross-Stitch Rectangle die on Kraft cardstock.  As this is such a bold design it did not require any embellishment so I merely created an A2 top folding card, again from Kraft and mounted the panel on to it with foam tape.

Why not enter, you never know you could be the recipient of a $50 MFT Store Voucher!

Happy Colouring


13 November 2018

MFT RELEASE DAY - NOVEMBER 2018

Well, the day you have all been waiting for has finally come!
The new release is now available at MFT Stamps Store

Before you head on over and fill your basket, allow me to share with you the last of my projects for this awesome November release:


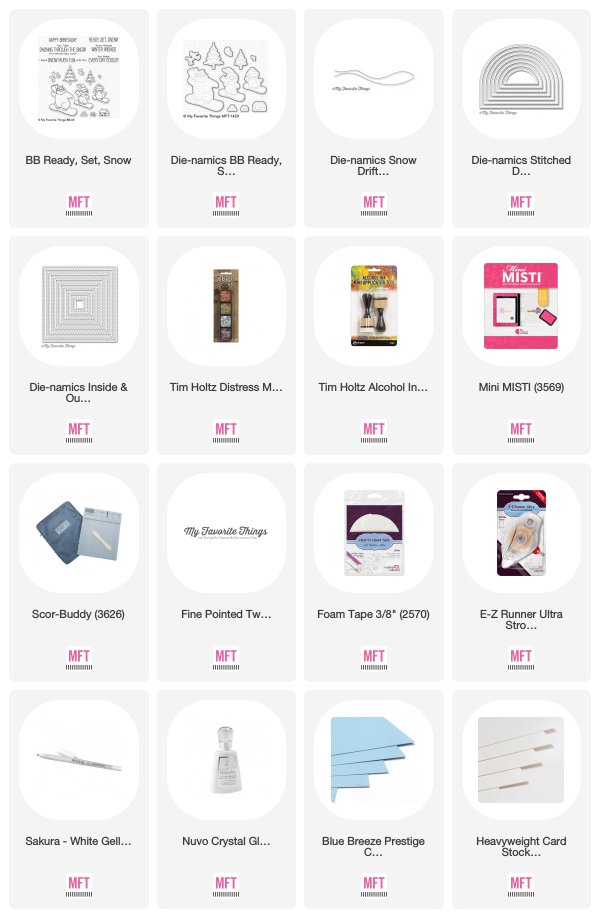
Are these adorable or what!  You are definitely going to want to add Birdie Brown's Ready, Set, Snow on your shopping list!

I stamped the images on to Copic suitable card with Cement Grey Hybrid ink and then coloured them with Copic ink.  Their goggles were created using a little Nuvo Crystal Glaze.

COPIC COLOURS:
Rabbit: T0, T1, T2, T3, T4, T5, T7, RV93, R20, E23, E27, W8
Scarf: RV32, RV34, R56, W4, W6
Goggles: R35, R39, YG63, YG67
Snowboard: RV10, RV32, RV34, R56, W1, W2, BV23, BV25, 0
Bear: E40, E41, E42, E43, E44, YG63, YG67, W8
Scarf: B21, B23, B24, B26, C4, C6, 0
Goggles: B26, C4, R29
Snowboard: B21, B23, B24, B26, B29, B99, BG02, BG07, 0, BV25, BV29, W1, W2


As you can see from the images, I opted for a tent fold Smooth White card today, using a Stitched Dome Stax for my main panel.  I cut the base from Blue Breeze, with a white layer of Smooth White.  This was then trimmed using a Snowdrifts die before being inked with Tumbled Glass Distress ink.  As I've done previously within this release I used Picket Fence Distress ink, a natural sponge and a white gel pen to give that extra snowy feel to the card.
The bear was stuck on with glue, whereas the rabbit was attached with foam tape for added dimension.
The base panel was inked and sponged as before, with the sentiment panel being stamped with Versamark ink and heat embossed with Wow Metallic First Frost Embossing Powder.

Now don't forget, as it's release day please leave a comment at the end of this post for your chance to win one of two $100 MFT Store Vouchers - you never know it could be you!

Happy Shopping

10 November 2018

MFT DECEMBER RELEASE - COUNTDOWN DAY 3

Thank you for visiting my blog, I have a wonderful new stamp that will be released on Tuesday at My Favorite Things.


I started by cutting a square with the Inside and Out Stitched Square Stax from Bristol card.   To create the speech bubble I cut out the shape using Essential Speech Bubbles from a piece of masking paper and applied this to the card which I then inked with Tumbled Glass Distress ink. Once the ink was dry I added a few faint tree shapes with Copic markers.

The snowman was stamped with Cement Grey Hybrid ink on to Copic suitable card and coloured with Copic Markers. I then decided to fussy cut the snowman.


COPIC COLOURS:
Body: BG0000, BG000, C00, C0, C1, C2
Accessories: G12, G21, G24, W1, W3, W5, W6, YR12, YR18, YR21, E33, E35
Background: BG70, N0, N1

I glued the snowman on to the card after I had stamped the sentiment with Versamark ink and heat embossed it with Silver Embossing Powder.  With the use of a natural sponge, some Picket Fence Distress ink and a Sharpie Medium Point Paint Marker I added a little texture to give the appearance of snow.

The image panel was adhered to a top folding square card made from Smooth White Card.

I will be back on Release Day with another project using this month's new releases.

Until then....
Happy Colouring


9 November 2018

MFT NOVEMBER RELEASE - COUNTDOWN DAY 4

Something a little different from me today:


I started with a top folding A2 card made from After Midnight cardstock which I stamped with small snowflakes from You Make My Heart Melt and Versamark ink.

The main panel was cut from Silver Sparkle card with the new Snowflake Window die.  In fact I cut it out three times, with the second two layers being Black Licorice.  The three layers were glued together and helped make the the sparkly snowflakes more prominent.


To make it stand out further, I cut two mounts, from Black Licorice and After Midnight cardstock using stitched and plain die-namics rectangular dies.

Hope you like it, until next time
Happy Colouring


8 November 2018

MFT NOVEMBER RELEASE - COUNTDOWN DAY 5

Woo hoo, it's that time again when I start to share some of the new stamps and dies that will be coming soon to My Favorite Things


This adorable little owl is from the new Stacey Yacula stamp set - Warm and Feathered Hugs.

I cut a panel from Copic suitable card with a Stitched Hexagon Stax on which I then stamped the owl and tree with Cement Grey Hybrid ink. The image was coloured with Copic Markers.

COPIC MARKERS:
Background: B000, W1, W2, BG0000, BG70, N0, N2, N4, E30
Sled: E30, E31, E34, W2, B00
Owl: YR30, E40, E41, E70, E71, E74, E77, Y35, YR24, W8
Scarf: YG61, YG63, YG67, W2, W4, Y35


A little extra texture was created by adding a small amount of doodling with a white gel pen.

The panel was adhered to a top folding card I cut from Smooth White card using the largest Stitched Hexagon die.

I will be back tomorrow with another card.

Happy Colouring